How to Update Your WordPress Website
Once your WordPress website is up and running, you’ll need to maintain it regularly to keep it going.
This is why it’s important to keep your WordPress site up to date. If you ignore the update message on your WordPress dashboard, your site could become incompatible, stop working, or even crash.
Fixing these problems is hard, so it’s better to take steps to stop them from happening in the first place.
Why Should I Update WordPress?
Every part of your WordPress website should be kept up to date, from plugins to themes to the core WordPress software. Updating your core files in particular can help improve your site’s:
- Performance
- Compatibility
- Functionality
- And, most importantly, Security.
WordPress releases maintenance and security updates as well as major version updates from time to time. Each of these updates could have new features, bug fixes, and fixes for more serious security holes.
For example, the latest version of WordPress, 5.8.1, fixed three major bugs, one of which was a cross-site scripting (XSS) bug in the Gutenberg block editor. If you don’t keep your core software up-to-date, you leave your site open to both known and unknown threats.
a recent Sucuri report says that about 49% of hacked WordPress websites are already open to attack when they are hacked.
This means that website owners are still falling behind on updating core files and things like themes and plugins.
Backup Your Website Before Updating Your WordPress Version.
Make sure you have a full backup of your site before you update to the latest version of WordPress. Your core files, plugins, themes, database, and media uploads are all part of a full backup. This needs to be kept on your computer or in the cloud (like in Google Drive).
If something goes wrong during the update process, you will be able to fix your site if you have a backup of it (which is unlikely but better to be safe than sorry).
You can follow the step-by-step instructions on How to Backup Your WordPress Site Manually or With a Plugin such as https://wordpress.org/plugins/all-in-one-wp-migration/ to name just one plugin that is available.
Here is a video showing you the backup process plus other options available.
Once you’ve made a backup of your site and saved it, you’re ready to start the update process.
1. Use the WP Admin Dashboard to update WordPress
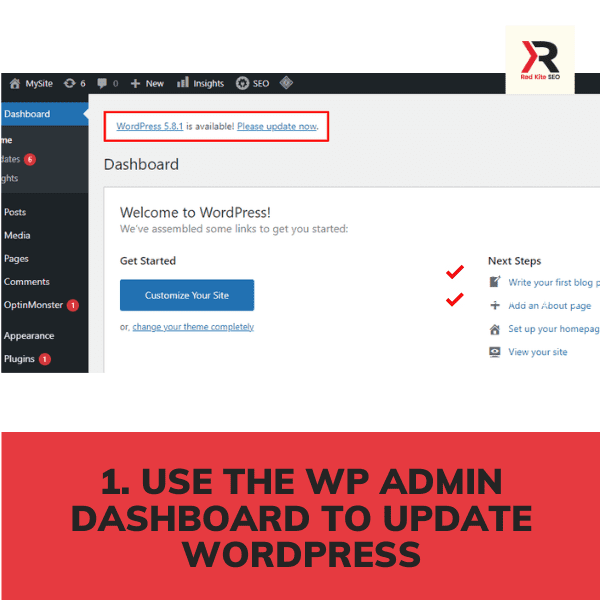
This is one of the easiest ways to update your site with the latest version of WordPress. This manual update process is just a click away, and the installation process will only take a few minutes.
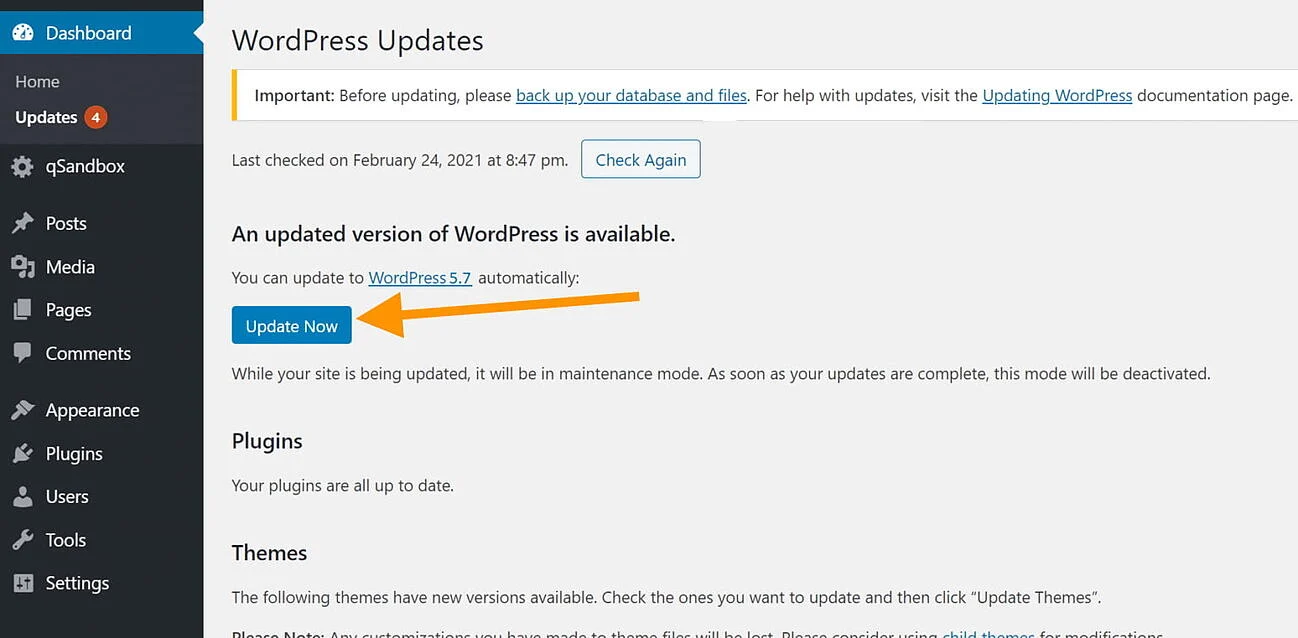
All you need to do is log in to your WordPress admin dashboard. Then, look at the top left-hand side of the admin dashboard tab labelled updates to see if there is a new release of WordPress.
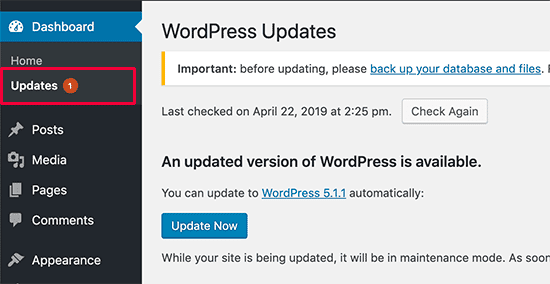
To start the website update, click update now. You’ll have to press the Update Now button again on the Updates page for the latest version of the core WordPress.
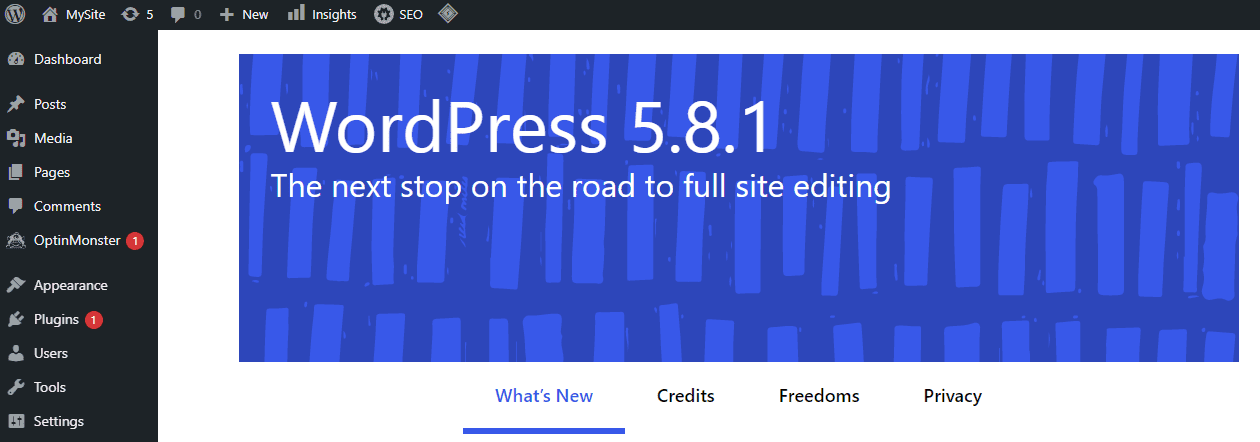
The new WordPress version has a screen that says “Welcome.”
Now you can update all of your themes and plugins to make sure they work with the latest version of WordPress.
When an Updates Notice will appear
For smaller updates, you’ll see a badge with a number displayed on the updates tab, with options to update the plugins and themes.
2. Manually update WordPress through FTP
Another option to update WordPress safely is through FTP.
What is FTP?
FTP stands for “File Transfer Protocol.” It is a set of rules that tell computers how to send files from one system to another over the internet. Businesses use FTP to send files from one computer to another, and websites use it to upload and download files from their servers.
What are the benefits of using FTP?
Here are just a few advantages of this time-tested transfer method:
- Allows the transfer of multiple files and directories
- Ability to resume a transfer if the connection is lost
- Ability to put items into a queue to be uploaded or downloaded
- Allows you to schedule transfers
- No size limitation on single transfers (browsers only allow up to 2 GB)
- Scripting capabilities through command line
- Synchronizing utility
- Faster transfers than HTTP
- Supported on almost all hosts
What are the disadvantages of using FTP?
Disadvantages of Using FTP
- FTP Lacks Security. FTP is inherently a non-secure way to transfer data.
- Not All Vendors Are Created Equal.
- Encryption isn’t a given.
- FTP can be Vulnerable to Attack.
- Compliance is an issue.
- It’s Difficult to Monitor Activity.
How do I use FTP?
Use an FTP client like FileZilla, cyberduck or the File Manager to connect to your website hosting control panel to manually update your WordPress site. For this method, you need to go to the root directory of your WordPress site.
This video helps you take the steps to set an FTP connection up with your hosting.
Again, Backup Your Website Before You Update.
If your website is bigger than 3GB, you should not use the cPanel Backup Wizard to backup up your files. Instead, use FTP. In the example below, we use the free FTP client FileZilla. If you prefer, you can use a different FTP client. Depending on the FTP client you are using, the steps below may be different.
Please note that you can’t back up databases with FTP; you’ll have to do it in your cPanel.
How to Backup Your Website Using FTP?
Here’s a video explainer for creating a website backup using FTP.
Update WordPress Using FTP.
You’ll have to overwrite the old WordPress core files (wp-includes and wp-admin) with the new ones. You can get the latest version of WordPress at https://wordpress.org/download/
Follow the steps below to use FileZilla to update your WordPress website:
- Get the most recent version of WordPress and open the ZIP file.
- To make sure you don’t access any important data, go to the extracted folder and delete the wp-config-sample.php file and the wp-content folder.
- Use FileZilla or your favourite FTP client to log in to your WordPress site.
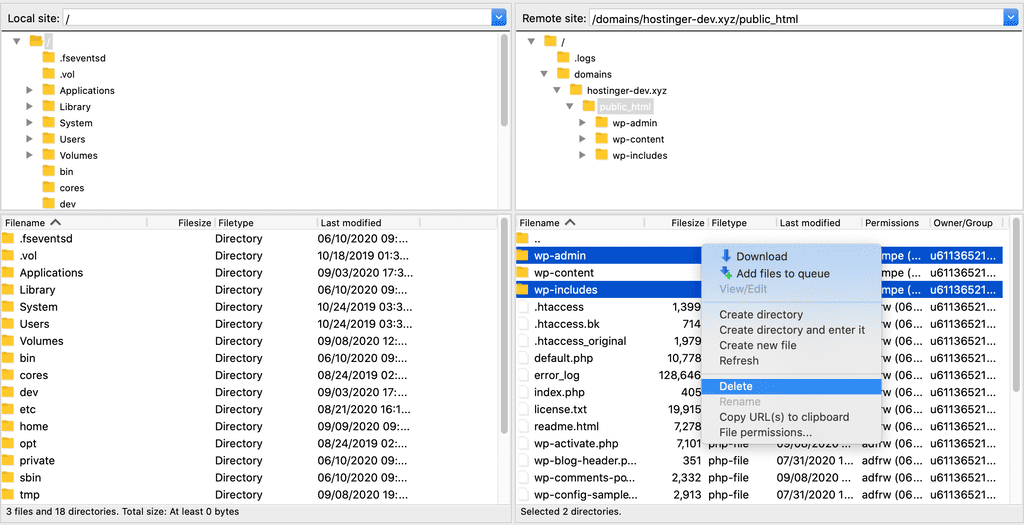
- Find the wp-includes and wp-admin directories on the right side of the panel (remote site), then right-click to delete them.
- Getting rid of the directories wp-admin and wp-includes. On the left side of the panel, choose the new wp-includes and wp-admin folders for the local site, then click Upload.
- Uploading the new directories for wp-admin and wp-includes. Upload the rest of the WordPress files from your computer that you have already unzipped to the web host directory. Overwrite the old WordPress files with new ones by uploading them on the server. When you see the message “Target file already exists,” choose “Always use this action” and “Apply to current queue only.”
- Once all of the files are uploaded, go to yoursite.com/wp-admin/upgrade.php to see if the WordPress updates for your website via FTP went well.
3. Update WordPress via WP-CLI
What is WP-CLI?
WP-CLI is the command-line interface for WordPress. You can update plugins, configure multisite installations and much more. For example, macOS device would already have the Terminal application installed, and on a Windows or Linux device, you can install the PuTTY application.
WP CLI allows developers or programmers to work around simple tasks that require only a few lines of code. With the introduction of WP-CLI, all of this has changed.
If you want to perform simple WordPress tasks in the most efficient way possible, you need WP-CLI on your side.
Consider being able to complete WordPress-related tasks without having to open a browser and log in to WordPress. You can use WP-CLI to do anything you’d normally do in the WordPress Admin panel without having to login to the site.
It’s extremely useful and a huge time saver.
What Can WP-CLI Help With?
Essentially, any general administrative task you’ll need to perform within the WordPress dashboard can now be performed from the command line. This tool can assist you in creating a new site, managing an existing site, or making changes to an existing database.
Some core functions that WP-CLI can be used to complete are:
- Installing a fresh WordPress installation
- Updating and installing WordPress themes and plugins
- The ability to list all plugins and their status
- Updating the core WordPress framework
- Uploading media files in bulk, avoiding having to do one at a time
- Creating database backups and restoring existing databases
- Creating or changing user accounts and permissions
- Easy search and replace functionality within the database
To see what basic functionality WP-CLI is equipped with, you can check out their complete list of basic commands.
If you are reading this method of updating WordPress, you probably already have SSH access to your WordPress root directory in the public_html folder.
When everything is configured, take the following actions to update the WordPress site safely to the latest version:
1 – Once you have access to your SSH account, use the cd command to switch to your WordPress root directory by using the following line:
cd public_html
To list your directory contents, type in the ls command or type cd ~ to change your directory to home.
2 – Enter the following command to check if the latest version of WordPress is ready to update:
wp core check-update
3 – If there’s a new version of WordPress available, you will see a similar message:
+---------+-------------+---------------------------------------------------------------+

| version | update_type | package_url |

+---------+-------------+---------------------------------------------------------------+

| #.#.# | minor | https://downloads.wordpress.org/release/wordpress-#.#.#.zip |

| #.#.# | major | https://downloads.wordpress.org/release/wordpress-#.#.#.zip |

+---------+-------------+---------------------------------------------------------------+

4 - If there are no updates available, you will see this message instead:
Success: WordPress is at the latest version.
5 – To start the update, run the following line:
wp core update
6 – Wait for the process to complete, and your WordPress website will be updated automatically.
Now that you know how to update the core files via WP-CLI, it’s time to upgrade your database. Run these following commands to update WordPress plugins and themes:
wp core update-db

wp theme update --all

wp plugin update --all
When the program finishes the update process, rerun the previous commands to confirm whether everything is updated correctly.
Checkout the video with help for getting started with WP-CLI update method.
4. Update WordPress Using a Staging site or Staging Environment
A staging site is a duplicate of your live site. Here, Separate and copy is the key point.
Because a staging site is independent of your live site, you can upgrade to a new version of WordPress, upgrade your theme, or update your installed plugins without affecting your live site.
Because a staging site is a copy of your live site, you can make changes and test them on it as if it were your live site. After you’ve confirmed that the changes you made on staging look good and function properly, you can make the same changes on the live site.
Testing updates on a staging site before applying the updates on your live site helps ensure:
- Your site is still fully functional and continues working as it should after updates.
- There’s no disruption to your online presence that you rely on to promote your brand awareness and preserve your credibility.
- There’s no loss of revenue and customers because of unplanned downtime.
- There are no search engine penalties from non-working pages or missing content (e.g., 404 or 500 errors).
- There’s no loss of precious site content or customer data—namely for membership, e-learning and E-commerce sites.
What is a staging site?

A staging site is a duplicate of your live website that is used to test changes before they go live. Staging sites allow you to catch errors before they break your live website.
To test changes, many users install WordPress locally on their Windows or Mac computers. When they’re finished with the updates, they simply upload the changes from the local host to the live server.
The main issue with this approach is that what worked on your localhost might not work on the live server.
Localhost and live WordPress hosting servers are frequently not in the same environment.
Because the staging site is hosted on your web hosting server, you can easily avoid all of these errors because it uses the same server configuration as your live site.
With that said, let’s look at how to set up a WordPress staging site.
How Do You Create a WordPress Staging Site easily?
There are several approaches to building a WordPress staging site. The most straightforward option is to use your hosting provider’s built-in staging site feature, typically found in Cpannel.
Some of the best WordPress hosting providers already provide one-click staging websites. If you have your website hosted with one of them, you can easily create a staging site.
If you do not use one of these popular hosting services, we have a solution to help you in creating a WordPress staging site using a plugin (and even manually).
Here is a video overview of creating a free WordPress staging site using a WordPress plugin.
Create a Staging Site for WordPress Manually
This method requires you to manually create a staging site for your WordPress install. It is for advanced users and requires more work than the other methods described above.
Another disadvantage of this method is that your website will be temporarily unavailable when deploying changes back from a staging environment to a live server. For that reason, I recommend the other methods explained and will skip this part.
However, if you want to choose the manual method, read https://themeisle.com/blog/wordpress-staging-site/#manually
5. Update WordPress Automatically
By default, the WordPress platform will update your site whenever there are minor updates, such as fixes for stability and maintenance.
Depending on your web host, you can set up automatic updates for major releases. Updating a WordPress website is a complicated process, but with this method, you can use a plugin like Easy Updates Manager to update your website automatically.
How to Update WordPress Automatically via Dashboard
- Go to Dashboard > Updates.
- It should say “This site is automatically kept up to date with each new version of WordPress.”
- If it doesn’t, click the hyperlinked text “Enable automatic updates for all new versions of WordPress.”
Automatic updates via the wp-config.php
You can also turn on automatic WordPress updates by adding a line of code to the wp-config.php file. To do it, follow the steps below:
- Sign in to cPanel and go to the Files section.
- From there, go to the File Manager.
- Once you’re in the public html folder, scroll down and click on the wp-config.php file.
- Press the “Edit” button in the menu at the top.
Change or add the line below:
define ('WP AUTO UPDATE CORE', true);
Click Save to finish. That’s how to update WordPress to the most recent version in a safe way.
As of 2022, there are about 1.4 billion total websites on the web. More than 455 million sites use WordPress.
How Long Does WordPress Take to Update Changes?
In general, your WordPress site should update immediately after you save it. That is, you should be able to hit the save button, open the page in question, and see the changes immediately.
However, if you have a cache plugin installed, you will need to either clear your cache or turn it off during your updates.
Why Is My WordPress Site Not Updating?
There are several types of caching that could be keeping you from seeing changes on your WordPress site:
- Browser caching – the web browser cache stores certain static files on visitors’ local computers.
- Page caching – stores the static HTML version of your site rather than generating it “on the fly” for each visit using PHP.
- CDN caching – reduces global load times by caching your site’s static content on a global network of servers.
You don’t need to understand the mechanisms of caching right now. The fundamental issue is that an older version of your site is still saved in the “cache.”
Even if you’ve updated the version on your WordPress server, visitors (and you) may still be seeing an older and cached version of your site, masking the changes you’ve recently pushed live.
What is Caching?
How to Fix WordPress Site Not Updating Issues
We’ll divide these troubleshooting steps into three main sections:
We suggest going through the first three from the top to the bottom. That is, clear your browser’s cache first and then move on to the others.
Fix Problems With Browser Caching
Browser caching works by storing certain site assets in your computer’s browser cache. It avoids repeatedly downloading these assets directly from your WordPress site’s server. To fix the problem, you can force your browser to download the freshest versions of all files from your server instead of loading them from the cache.
Here are a few ways to accomplish that.
Hard Refresh Your Web Browser
The simplest solution to fix browser caching issues on a single page is to hard refresh your web browser.
To do this, open a tab with the page on your site where you expect to see changes. Then, hit the following keyboard combinations:
- CTRL + F5 on Windows
- Cmd + R on Mac
Clear Your Browser Cache
If the hard refresh didn’t work, you might need to clear your browser’s cache completely. This will wipe out all of the cached files, ensuring that you download new versions of all files across your site.
The exact instructions vary depending on which web browser you’re using,
- How to Clear Browser Cache for Google Chrome
- How to Clear Cache for Mozilla Firefox
- How to Clear Cache for Safari
- How to Clear Cache for Brave Browser
- How to Clear Cache for Internet Explorer
- How to Clear Cache for Microsoft Edge
- How to Clear Cache for Opera
How to Clear Cache in Plugins
If you’re using a Wordress caching plugin to handle page caching.
All caching plugins include options to clear your site’s entire cache (and sometimes just the cache for individual pieces of content where you’re having issues).
Most caching plugins behave similarly so you can use the same idea in other plugins.
You can click the Delete Cache option on the WordPress toolbar or in the plugin’s settings.
Some cache plugins like WP Rocket also have a useful function to delete cache and prebuild the new cache version of your website.
How to Fix CDN Caching Problems
If you’re using a content delivery network (CDN) to speed up the time it takes for people around the world to load your WordPress site, that could be another reason why your changes aren’t showing.
A CDN works by caching the static parts of your content on its network of servers all over the world. Then, it sends these files to each visitor from the place that is closest to them.
But if your CDN has saved an old version of an image file or CSS stylesheet, WordPress changes might not show up. This is not likely to happen with your content itself, but it is a common problem with static files like images and scripts that you may be hosting on the CDN.
As with other caching problems, you can fix this by clearing the cache at your CDN. The exact steps to do this will depend on your CDN provider.
Typically, you’ll need to login to your CDN service, locate the clear cache option. Some CDN services offer a WordPress plugin, which makes clearing your CDN cache a lot easier.
Bunny CDN, Clouldflare and AWS Cloudfront are popular CDN choices.
Conclusion: Keeping Your WordPress Software Up-to-Date
Maintaining Your WordPress Software is vital!
I hope using any of the 5 methods you can easily update your WordPress website. Whatever method you use to perform software updates, it’s critical that your site always runs the most recent version of WordPress. It will help to ensure that your site remains secure and that you continue to provide the best user experience possible.
Red Kite SEO
Image/Content Credits:
- https://www.hostinger.co.uk/tutorials/how-to-update-wordpress#1_Update_WordPress_via_the_WP_Admin_Dashboard
- https://pagely.com/blog/what-is-wp-cli/
- https://www.uncannyowl.com/wordpress-staging-sites/

Pete Hogg is an accomplished SEO consultant with a proven track record of driving organic traffic and boosting online visibility. With 8 years of experience in the ever-evolving world of digital marketing, he has helped businesses achieve top rankings on search engines. A passionate advocate for SEO best practises, Pete Hogg combines technical expertise with a deep understanding of content strategy to deliver results that matter. When not optimising websites, he enjoys wheelchair rugby. Connect with Pete Hogg to take your online presence to the next level.